Tuesday, June 15, 2010

We have the Greatest Friends EVER

Yesterday I came home to find this sitting in the mail pile.


WOW, that's all I could say! The wrap-around label, the custom printing of our address, the LOVE stamp, it was gorgeous! So modern, so fun and so very thoughtful. I turned it over to open but someone *ahem* was also excited and beat me to the punch. However, he did such a good job of opening the envelope because the return address was in tact and it was very picture-worthy. He knows me too well!


I knew what was coming from here and couldn't wait to show Curtis! It's our shower invite!!!! Our wedding party is throwing us a Couple's Honeymoon Shower! Everything about the invite screamed Fiji to me; bright, cheerful, colorful and fun but was done in a very classy way. Our friends are soooooo good to us! :) I can't imagine the time (and emails) that went into making these but we are forever grateful for their efforts.

And without further ado, here are the invites! They are flat out PERFECT. And I'm obsessed with the wrap-around look; that is such a popular design right now and I love it so much!


The full suite; side 1. I love the Bon Voyage text and swirls!


The invite says "Please Join Us for Hors D'Oeuveres, Drinks and Cheer at Curtis + Frances' Honeymoon Shower" Why of course!!!


The full suite; side 2. Info about the party and registry information. Notice how it "wraps" around the invite. The wrapping is a theme throughout. So smart guys, so smart. :)


Details! I RSVP'd the second I got it and hopefully was the first one!


Per our request, the party is at our house. It's too perfect for parties with the large deck and downstairs area to pass up that opportunity. I am, however, being kicked out the day of, haha. I may go treat myself to a year long overdue haircut that day while Curtis plays a few holes of golf or something but the anticipation is going to kill me! I love surprises but after seeing this, I'm literally counting down the days until this shower. We really have the greatest friends in the world, EVER!

The invitations were designed and printed by Caroline Latawiec. After seeing these, she's booked for our wedding invites. :) More to come on that in a later post but this made me realize that while I love a good DIY project, there are just some insanely talented people out there who can take my ideas to levels I never thought possible. We have a meeting tonight to discuss invites and hopefully I'll have an invite mock-up to show you all soon! She is the most fabulous invitation designer I know and we're so lucky to have her available to help us!

WE ARE THE LUCKIEST PEOPLE IN THE WORLD!!! Thank you wedding party for putting up with my crazy ideas and antics for a full year already and I hope you all know how much you mean to us. We love you!!!!


Ring a Ding Ding!!!!

We have become very close friends with the UPS guy lately. It seems everyday we come home there is a new package on the doorstep. Yesterday he dropped off one of my favorite packages so far. Curtis' wedding band! He found one he really liked online and we ordered it to see what it looks like in person. Turns out, we both love it! He wore it around the house for a few hours last night to make sure the size was right and the band wasn't too bulky. I was giddy and giggly the entire time. I must say, seeing him with a ring makes me happier than anything else we've done so far because I know that the next time he's wearing it will be when we're husband and wife. And THAT is the greatest feeling of all! :D


Yes, that's the ring package and yes, that's another package in the background. Boxes are everywhere!


I tried to get a close up of the ring but failed because I took these around midnight. It's a Titanium band with some variance of polished and brushed looks. It looked so good on his finger! I didn't get any pics of him wearing him mostly because I was just too giddy to think to find a camera. I can't wait until this is officially on his finger! :)


DIY Tissue Cards

As noted in a previous post, I knocked out another project last night, the Tears of Joy tissue cards! They turned out to be a really cute and easy project to finish and I love the way they look. :)

They were very easy to make and they're a big hit on Weddingbee! I started with plain cardstock, printed "Tears of Joy" on each piece about 6 times (including a double line border on top/bottom), cut those out and glued the ends to a 4x5 piece of cardstock I also cut to size. After that, I took some leftover tissues I didn't use in the bathroom baskets and tucked 1 tissue behind the band. Viola! That's all there was to it! :) I think this took about 1.5 hours and it was completely worth it. It also gave me an excuse to catch up on some long over-due House Hunters International.

I made around 40 of them so feel free to use at the wedding! They will be placed randomly on the pews with a few outside if you need extra.


This shows how big they are. (And it was a great excuse to get another ring shot in!)


Friday, June 11, 2010

Let's Rehearse!

Curtis and I finally picked a Rehearsal Dinner location! After discussing with his parents, we have all decided on the incredible Isabella's Italian Restaurant and Wine Bar. We are so lucky to have our rehearsal dinner there as it's the perfect combination of class, great food and top-notch service. :)

Isabella's is located at Legacy and 121 in a beautiful Piazza overlooking a large fountain. The restaurant reminds us so much of Italy as it's charming and beautiful, elegant but comfortable. We'll have the main dining room to ourselves, which is so nice, so we'll be able to say our thank you's without half of the diners listening in. :) Here are a few pictures!


And here's the delicious menu options we'll have to choose from! All of these are wonderful and we couldn't believe how big the portions were. Italians definitely do not skimp on their food! :)

Appetizers- served family style

Assorted Pizzas- Prosciutto, Bianca, Margherita, Pollo, Salsiccia

Calamari e Fritti- Crispy calamari served with lemon & spicy tomato sauce

Bruschetti- Grilled bread with oven dried tomatoes topped with pesto and goat cheese


Entree Options

Penne Pasta con Pollo- Penne pasta with chicken, artichokes, zucchini, sundried tomatoes in a light basil broth with pesto and parmesan

Penne alla Primavera- Penne pasta in a sauce of peppers, zucchini, squash & asparagus

Pollo Arrosto- Herb roasted chicken breast served with cipollini onions, haricot vert, soft polenta with a Marsala sauce

Spaghettini alla Pomodoro with Pollo Griglio- Spaghettini pasta with a natural tomato sauce made with garlic & basil and chicken

Bolognese con Papparelle- traditional sauce of ground beef, veal and pork served with pappardelle pasta

Gnocchi con Quatro Formaggio- homemade gnocchi finished with four cheeses


I can't say enough great things about this restaurant! The food is fantastic, the service is wonderful and the location is perfect. We are so lucky to have such a wonderful restaurant for our rehearsal dinner and I can't thank Curtis' parents enough for allowing us such a luxury.

Now I can bust out the Gocco again and start making the invites and menus!

Wednesday, May 26, 2010

Gone but not Forgotten

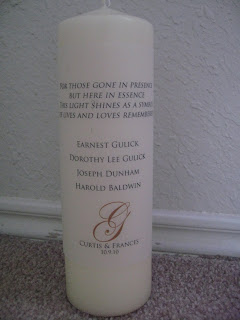
Curtis and I wanted to find a special way to honor those who will be watching us from above. We thought a candle would be a perfect to way to include our grandparents who cannot be there and we will have my Ma and his Grandmother light the candle together. This will be done during the processional when grandparents are being sat.

After the quick Unity Candle project, I decided to finish this one as well. I included a poem on this candle and listed out the names of those we have lost. I hope that this will help include them in our ceremony and let them know they are not forgotten.


The poem reads, "For those gone in presence, but here in essence, this light shines as a symbol of lives and loves remembered."

They are greatly missed and we wish they could be there with us to celebrate the start of our lives together.


Friday, May 21, 2010

United We Stand

I completed the EASIEST DIY project ever a few weeks ago! I knew all along I wanted to make our own Unity candle instead of spending $30 on one since I could customize it. And lord knows you all know how I feel about putting that monogram on just about everything by now. :)
We had purchased some large pillar candles at Ikea over Christmas in a really nice ivory color. I had already gone ribbon crazy last year so I had lots of ribbon to play with. I also bought vellum paper around Christmas because at the time, I just KNEW I needed it. Sure enough, I did! All you need is a candle, vellum paper, some ribbon and hot glue gun.
I printed our monogram on the vellum paper and trimmed it a bit so it would fit on the candle. Here's the before photo.:


I wrapped the vellum around the candle, lining up the edges, and hot glued it to the back of the candle. I then took 2 pieces of ivory ribbon and made a border. Voila! I love how simple it is. I played around with different designs and poems but we both love how this turned out.


I then took some navy semi-sheer ribbon I would have never used otherwise and tied it to the candles we'll take to light the main candle. I may end up making a bow out of the ties but I kind of like how it hangs. What you do guys think?


So simple and another DIY project checked off of the list! :)

Sunday, May 9, 2010

DIY Bridal Bouquet


This past Wednesday I headed out to Garrett Creek Ranch to take my bridal portraits I had mentioned before. Hair and makeup was awesome and I've booked both girls for wedding day already! On Monday, I stopped by Tom Thumb to pick up some flowers for my DIY bridal bouquet that I needed for the shoot. Just expecting to buy a few dozen roses, I figured putting together a bouqet of such would be a breeze. Luckily, I was right!

It helped that I had a very kind florist at the counter of Tom Thumb who walked me through the basic steps. She asked what my favorite flower was and I told her the orchid. She ran to the back quickly and emerged carrying the most beautiful, and largest, cymbidium orchids I had ever seen! I immediately committed to buying themon the spot (praying so hard that I wasn't about to spend my entire paycheck on a single stem of 12 orchids) along with 2 dozen white roses and to my surprise, the entire bouquet was less than $40! The average bridal bouquet is around $250 so this was a steal!


I let the flowers open up a bit overnight and stored both in the fridge, requiring an impromtu fridge cleaning. :) When I was ready to assemble on Tuesday evening, they were in perfect condition! I am making all bouquets for wedding day (5 bmaids and 1 bridal) so this was an excellent excuse to practice. I was thrilled with how well they held up and I'm very confident in doing this for wedding day.

I started off by cleaning each stem of the rose to rid it of thorns and imperfections. Then I moved on to opening each flower by hand, easily the most time consuming part of the whole thing. Since the roses were still tightly together, I peeled each petal back to make each rose about 3 times larger than it originally was.

Before they were fully opened...


After!!!

These orchids were so pretty and huge!

I started by taking 3 roses and wrapping floral tape around them. Then I bunched each set together, 2 at a time, until the bouquet was complete. I realize now that I should have done taped only 2 roses together at a time to create a rounder bouquet but that's why I did a trial! :) Each bridesmaid will have a dozen roses and I'll have a dozen roses as well as hydrangeas.

After the roses were complete and I had gone through almost an entire roll of floral tape, I took floral wire and threaded it through the center of 5 orchids. I then positioned each orchid randomly in the bouquet and wrapped the remaining wire around some of the stems. They were very hardy and are still going strong despite being without water for almost a week!

The last step was really easy as well. I took wide width ivory ribbon and wrapped it around the floral tape to hide everything. I forgot to cut them stems again at the bottom so they were even but again, lesson learned. I used pins to fasten the end of the ribbon to the stems and voila! Bridal bouquet! :) It took about an hour and a half from start to finish, with 45 minutes of just opening the flowers. Another DIY project I'm proud of! :)