Turning our wedding blog into a travel blog! Follow us as we share our adventures in globe trotting.
Wednesday, May 26, 2010
Gone but not Forgotten
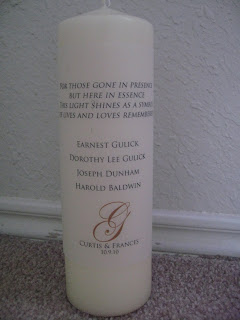
After the quick Unity Candle project, I decided to finish this one as well. I included a poem on this candle and listed out the names of those we have lost. I hope that this will help include them in our ceremony and let them know they are not forgotten.
Friday, May 21, 2010
United We Stand
We had purchased some large pillar candles at Ikea over Christmas in a really nice ivory color. I had already gone ribbon crazy last year so I had lots of ribbon to play with. I also bought vellum paper around Christmas because at the time, I just KNEW I needed it. Sure enough, I did! All you need is a candle, vellum paper, some ribbon and hot glue gun.
I printed our monogram on the vellum paper and trimmed it a bit so it would fit on the candle. Here's the before photo.:
I wrapped the vellum around the candle, lining up the edges, and hot glued it to the back of the candle. I then took 2 pieces of ivory ribbon and made a border. Voila! I love how simple it is. I played around with different designs and poems but we both love how this turned out.
I then took some navy semi-sheer ribbon I would have never used otherwise and tied it to the candles we'll take to light the main candle. I may end up making a bow out of the ties but I kind of like how it hangs. What you do guys think?
So simple and another DIY project checked off of the list! :)
Sunday, May 9, 2010
DIY Bridal Bouquet
I let the flowers open up a bit overnight and stored both in the fridge, requiring an impromtu fridge cleaning. :) When I was ready to assemble on Tuesday evening, they were in perfect condition! I am making all bouquets for wedding day (5 bmaids and 1 bridal) so this was an excellent excuse to practice. I was thrilled with how well they held up and I'm very confident in doing this for wedding day.
After!!!
These orchids were so pretty and huge!
I started by taking 3 roses and wrapping floral tape around them. Then I bunched each set together, 2 at a time, until the bouquet was complete. I realize now that I should have done taped only 2 roses together at a time to create a rounder bouquet but that's why I did a trial! :) Each bridesmaid will have a dozen roses and I'll have a dozen roses as well as hydrangeas.
After the roses were complete and I had gone through almost an entire roll of floral tape, I took floral wire and threaded it through the center of 5 orchids. I then positioned each orchid randomly in the bouquet and wrapped the remaining wire around some of the stems. They were very hardy and are still going strong despite being without water for almost a week!
The last step was really easy as well. I took wide width ivory ribbon and wrapped it around the floral tape to hide everything. I forgot to cut them stems again at the bottom so they were even but again, lesson learned. I used pins to fasten the end of the ribbon to the stems and voila! Bridal bouquet! :) It took about an hour and a half from start to finish, with 45 minutes of just opening the flowers. Another DIY project I'm proud of! :)


